Welcome to Luxe Nomad, a 2025 Mercedes-Benz Sprinter 170" 3500XD HO AWD luxury adventure van. This manual explains how to operate the van safely, protect the equipment, and return it in the same condition you received it.
Please read the safety, fuel, electrical, water, and return sections before your trip, and contact the owners if anything is unclear.
Quick-Start Checklist Before Driving Away
Before driving away, confirm the van height and correct fuel type, then complete the checklist below:
Take photos of the exterior, interior, fuel level, DEF level, and mileage.
Connect to Starlink if needed.
Review battery level, freshwater levels, and grey tank levels.
Locate owner contact information.
Ask any questions before leaving the pickup location.
Starlink WiFi: Use the owner-provided network name and password (provided at pickup).
Van 9527000HWGVZI60
Reolink Security Cameras: Download the Reolink app. Use the owner-provided username and password, along with the QR code, to add the cameras.
Fuel requirement: Use Diesel #2 or Renewable Diesel only. Do not use biodiesel. In California, Renewable Diesel is commonly available at Shell stations. If you are unsure about a pump, do not fill the tank until you have confirmed the correct fuel type.
Van Measurements
Height: 130" (10 ft 10 in)
Length: 298" (24 ft 10 in) without rear box
Width: 79" (6 ft 7 in)
Width with mirrors: 92" (7 ft 8 in)
Always check clearance before entering parking garages, drive-throughs, campsites with low branches, ferries, car washes, or tight fuel stations.
The fuel tank has been upgraded to 44 gallons. The fuel gauge is accurate, but the range estimate is not calibrated for the larger tank. For a more realistic estimate, add about 80% to the displayed range. For example, 300 miles displayed is approximately 540 miles actual.
Important: This Victron system is 120 volts only. Do not connect to 240-volt power. Confirm compatibility before plugging in.
Critical Rules
Review these rules before driving or using any onboard systems. They protect the van, prevent equipment damage, and help keep your trip safe.
Use Diesel #2 or Renewable Diesel only. Do not use biodiesel.
Do not plug into 240-volt power.
Do not let house batteries drop below 10%.
Do not step on solar panels.
Fill interior freshwater tank to 90% maximum only.
Do not use awning in windy conditions.
Watch van height at all drive-throughs, parking garages, trees, signs, and campsite obstacles.
Contact the owners immediately for any warning light, electrical issue, water leak, or mechanical concern.
Safety First
Always wear seatbelts while the van is moving. Before driving, adjust mirrors, review the camera views, and familiarize yourself with Mercedes driver-assist features such as Distronic, Lane Keep Assist, Blind Spot Assist, and the camera system.
Use caution on dirt roads, campsites, snow, sand, and uneven terrain. This lifted AWD Sprinter is capable, but it is not a technical 4x4. Do not drive on technical trails, deep ruts, steep obstacles, or terrain where body damage or vehicle recovery could occur.
Be careful around trees, signs, branches, and other obstacles that could scratch or damage the van. The van is very tall.
Emergency roadside assistance is available.
Driving the Van
Key Features: 2.0L High Output Turbo Diesel, AWD, Van Compass lift, BFGoodrich KO3 tires (295/70R17), upgraded 44-gallon fuel tank.
Comfort Features: Front heated swivel seats, heated steering wheel, MBUX touchscreen, Apple CarPlay, factory navigation.
The Van Compass Stage 6.3 System is a top-tier Sprinter AWD suspension kit with a 2" lift and VC-tuned Falcon 3.3 Fast Adjust shocks. It offers 10 intuitive firmness settings for each corner, allowing you to adjust from the softest to the firmest damping over a large range. See VanCompass for Falcon 3.3 adjustment details.
Falcon 3.3 Fast Adjust Inverted Rally Struts
General Setting Guide
Setting 1 – Softest compression
Best for: Off-road, rough terrain, maximum comfort.
Also good for: Empty or light loads, passenger vans.
Setting 2 – Mid-range, adjustable
Best for: Everyday use, city driving, mixed terrain.
Use the black micro-dial (active only in this setting) to fine-tune ride quality.
Micro Dial 1 = smoothest ride; Micro Dial 8 = sportiest.
Setting 3 – Firmest compression
Best for: On-road, high-speed curves, high winds, or fully loaded/towing situations.
Consult the Van Compass manual or owner for recommended settings. Do not exceed the manufacturer’s limits for load and tire pressure.
Power & Electrical System
Victron Premium System Overview
10 kWh 48V Victron Lithium NG batteries
400W solar
Secondary alternator: When the van is running, it can charge the house batteries at up to 6,500 watts and can top off nearly depleted batteries in under 2 hours.
Nomadic X3 AC. Refer to Nomadic Innovations for details.
Victron MultiPlus-II 120V, 5000VA, 48-Volt Pure Sine Wave Inverter Charger. Refer to Victron for details.
There are 6 dimmer switches: one at the entry in the upper cabinet above the slider, one at the third captain’s seat, one at each bump-out flare, one behind the TV, and one on the left side of the bathroom.
3 outlets: kitchen, third captain’s seat, and rear of van near the breaker switches
4 house USB ports: kitchen, flares, captain’s seat, plus several additional USB ports up front in the cab
Monitor levels on the Victron screen or app. Conserve when boondocking.
Do not let the house batteries drop below 10%. Monitor battery level on the Victron screen or app, especially when using the air conditioner, water heater, induction cooktop, microwave, or other high-draw devices. If the batteries approach 10%, charge the system by driving, using solar when available, or connecting to approved 120-volt shore power.
Water System & Sanitation
If there is a water leak, turn off the pump and contact the owners.
The van has 67 gallons of freshwater capacity with an advanced reverse osmosis (RO) system. It also has a 7-gallon hot water heater.
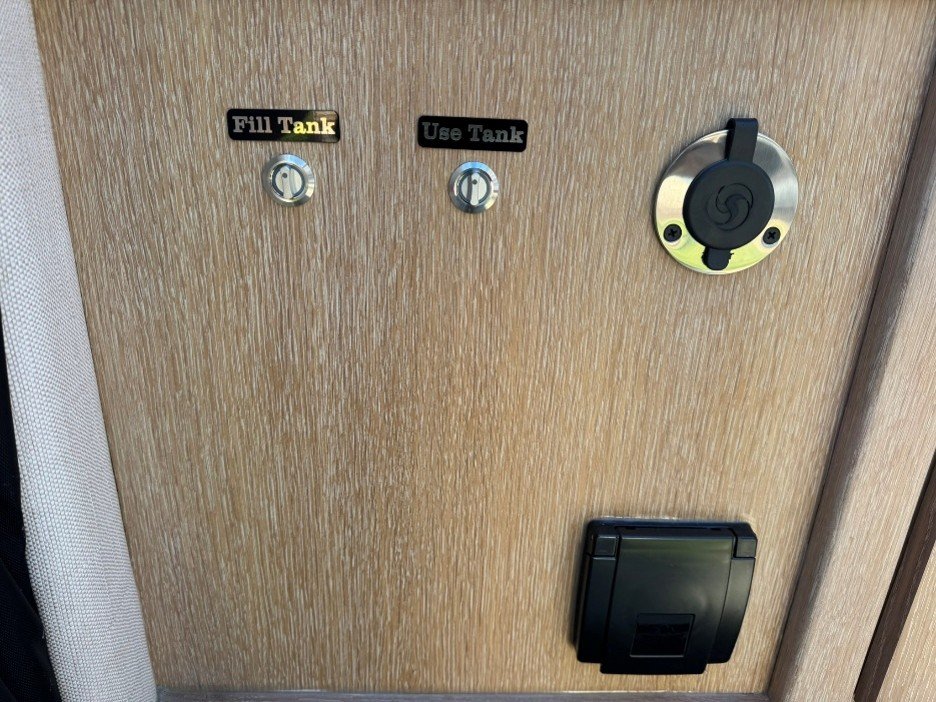
Only fill the interior freshwater tank to 90%. Overfilling may cause water to leak. To check the level, open the cabinet to the left of the wardrobe closet and use the maximum-fill black line as the limit.
Do not run fill water while the actuator tank selection is moving.
Reverse Osmosis (RO) system and Waterdrop instant hot water dispenser: Provides instant hot water at the kitchen sink. Great for tea, coffee, or quick cleaning.
Grey tanks: Monitor levels to avoid overflow. The shower grey tank holds 22 gallons, and the sink grey tank holds 5 gallons. Use the included adapter and hose to drain both tanks at an approved dump location before returning the van.
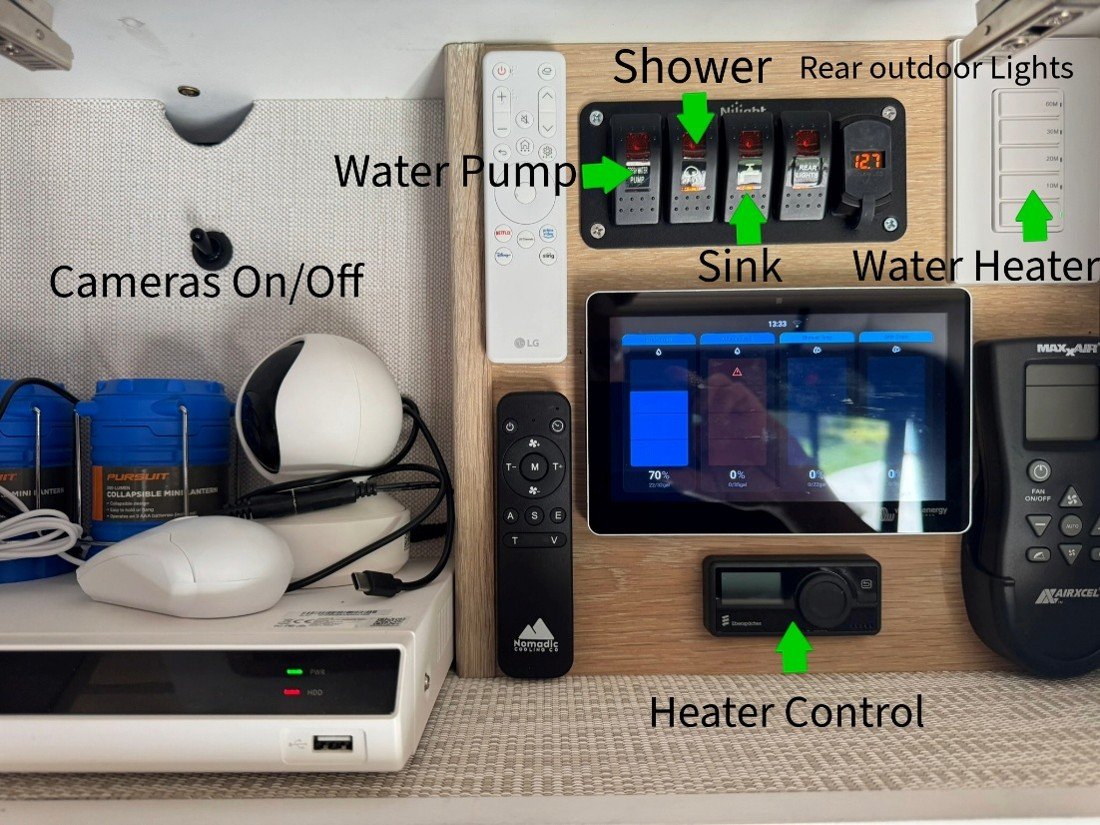
The water pump must be turned on when using the RO system, faucets, or shower.
For hot water, turn on the water heater using the white timed switch while driving or while connected to approved 120-volt shore power. The water heater uses a significant amount of electricity, so avoid running it unnecessarily when boondocking. Once the water is hot, it can remain heated for up to 24 hours, and the heater will automatically shut off when the selected time ends.
Sink (in kitchen)
There is no garbage disposal. Do not put food, grease, oil, or anything except water and soap down this drain.
Laveo Dry Flush Toilet
How to Use the Laveo Dry Flush Toilet
Lift the toilet seat/lid and use as normal.
For liquid waste, sprinkle 1 teaspoon (or as directed) of pee powder.
Press the flush button to rotate and seal the waste in a new bag. The system is odor-free when used correctly.
One refill pack is included. Additional packs cost $30.
Each refill pack gives you about 15 flushes. It is not necessary to flush after each urine use; we usually go 2–3 times between flushes.
Refer to Laveo Website for manual and for further details.
Kitchen & Interior
7-gallon Bosch water heater (see Water System section for more details)
Espar Airtronic S3 D2L Diesel 12V Sprinter Kit with EasyStart Pro Controller. Refer to Espar for details.
Isotherm fridge/freezer. Refer to Isotherm for details.
Nuwave Precision Induction Cooktop Gold. Refer to Nuwave Precision for details.
Electric cooktop
RecPro RV 1.1 Cu. Ft. Convection Microwave
5 Cooking Modes: Microwave, Broil, Combo Cooking, Convection and Grill
Keurig Coffee Maker: Use K-Cups or compatible pods. Fill reservoir with RO water in the amount you want coffee brewed.
Salt/pepper and common spices
Convertible table
Luno Air Mattress for front cab available upon request. Refer to Luno for details and how to videos.
Blackout shades for sleeping
Bed linens/pillows upon request
Exterior & Adventure Features
The onboard compressor, hoses, and attachments are stored in the black outdoor storage locker. Use the hose connection point at either the front or rear of the van. The van engine must be on to operate the compressor.
Rooftop deck with 2 ladders. DO NOT STEP ON THE SOLAR PANELS.
Manual awning. Do not use awning when windy. Crank for awning in overhead storage shelf above cab (see video).
2 camp chairs in the rooftop storage locker
Outdoor rug/mat
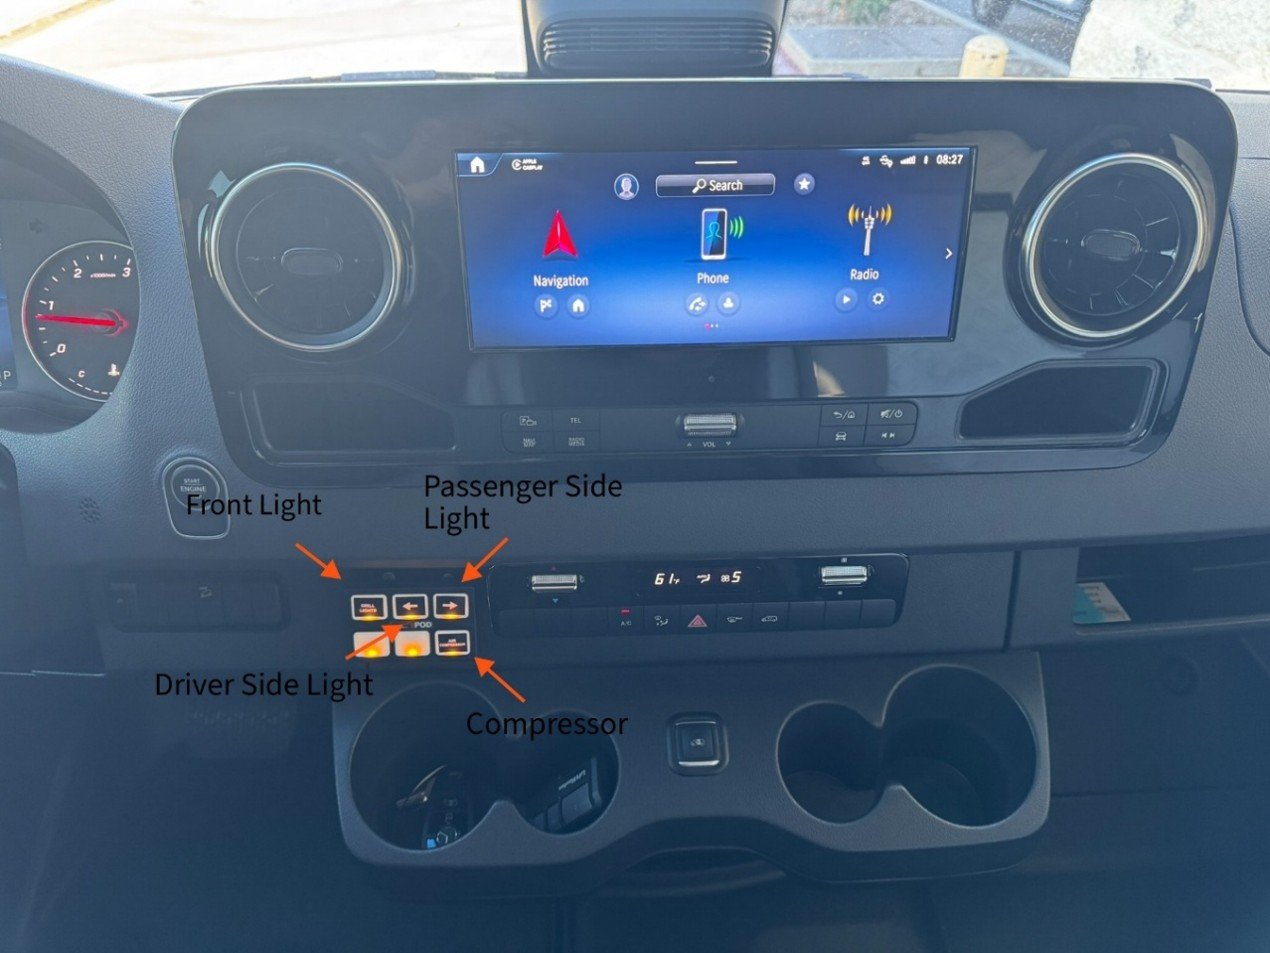
Campsite lights: the front and side on/off switches are in the cab. The rear light switch is in the overhead cabinet above the third captain’s seat. Refer to Image 2 and Image 3.
Sobo outdoor shower: Hose located in the black outdoor storage locker.
Coleman stove. Located in the rear black storage locker.
Roof boxes
360-degree security cameras with smartphone monitoring: See section one for app setup and password information. Turn the camera system off using the switch in the cabinet above the third seat if you do not want to use it. The doggy cam can be plugged into any USB-C port and will automatically connect. Refer to Image 2.
Amenities
Starlink Wi-Fi included. See Introduction section for setup instructions.
LevelMate helps level the van when parking. Download the LevelMate app and connect via Bluetooth while you are near the van.
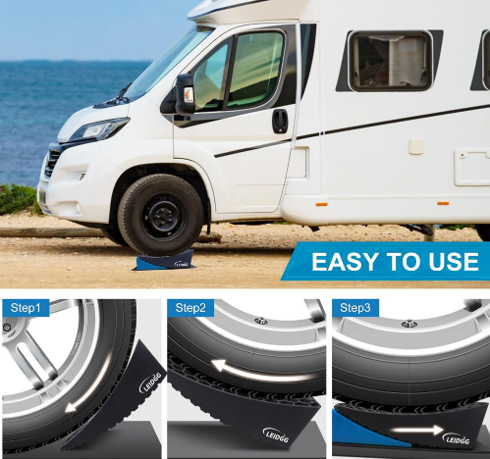
Use the leveling blocks stored in the black outdoor locker to level the van up to 4 inches.
Maintenance, Cleaning & Return
Please return the van in the same condition you received it. If anything is damaged, missing, malfunctioning, or unusually dirty, report it to the owners before drop-off so it can be addressed promptly.
Return Checklist
Before drop-off:
Refill the diesel fuel tank.
Top off DEF.
Empty both grey tanks.
Remove all trash and personal items.
Wipe down kitchen surfaces.
Return all hoses, adapters, ladders, the awning crank, and accessories to their storage locations.
Close and secure all cabinets, roof boxes, windows, shades, and doors.
Turn off lights, the heater, the water pump, cameras if desired, and nonessential electronics.
Report any damage, missing items, warning lights, or system issues before drop-off.
Emergency, Troubleshooting & 24/7 Support
Use this checklist for common issues. If a problem affects safety, mobility, water, power, or vehicle operation, contact the owners first whenever possible. If you cannot reach them or need roadside assistance, contact the emergency number provided for support.
Low house battery warning
If available, plug into approved shore power
Turn off unnecessary electrical appliances and allow the system to charge
If shore power is unavailable, run the vehicle to charge the house batteries
Water leak — turn off pump and contact owner. Getting stuck — contact owner.
Low or Flat Tire
Tire pressure should be: front 55 psi and rear 70 psi
You can use the onboard air compressor to inflate or top off tires.
If you get a flat tire
Spare is on the back door
Use key on van key chain provided to unlock spare
Lug key is in the black outdoor locker
Use the off-road base stand located in the black outdoor locker and the jack located under the passenger seat to jack up the Sprinter.
These are the only recommended points for lifting the van. If in doubt, do not try to jack up the vehicle. Considerable damage can occur if the van is improperly jacked up. When in doubt, seek help or contact the owners.
Front Jacking Points
Front support to spring clamp plate – located under the front frame near the suspension.
Front support to longitudinal member – on the front frame, close to the engine.
Lifting platform – a raised platform under the front frame.
Support plate / Long support plate – frame supports under the front.
Support drift – a frame drift under the front.
Rear Jacking Points
Rear jack tube on front rear spring bracket – under the rear frame, near the spring assembly.
Rear jack tube on longitudinal frame member – on the rear frame, aligned with the chassis.
Mount on front rear spring bracket – a bracket under the rear spring.
Lifting platform / Long support plate / V-block / Ram – frame supports and lifting surfaces under the rear.
How to Use Your Provided Jack
Park on level, firm ground and engage the parking brake.
Locate the correct jack point from the above list — match it to your jack’s attachment style.
Position the jack so the lifting surface is flush with the jack point and the jack’s base is stable.
Lift slowly until the wheel is off the ground.
Never work under the vehicle while it’s jacked up, even if you think it’s safe.
Owner Contacts
admin@mendozasrvrental.com
For urgent issues during your rental, contact the owners first at the emergency contact number provided.
Emergency roadside assistance is available on your trip.